

The Projects hub is the first page you see after selecting a tenant. It lists every project in the workspace (web applications, machine-to-machine clients, and MCP servers) and is where you create new ones.
The resource hierarchy is Organization > Tenant > Project > Environment. Projects live inside a tenant and contain one or more environments (for example dev and prod).
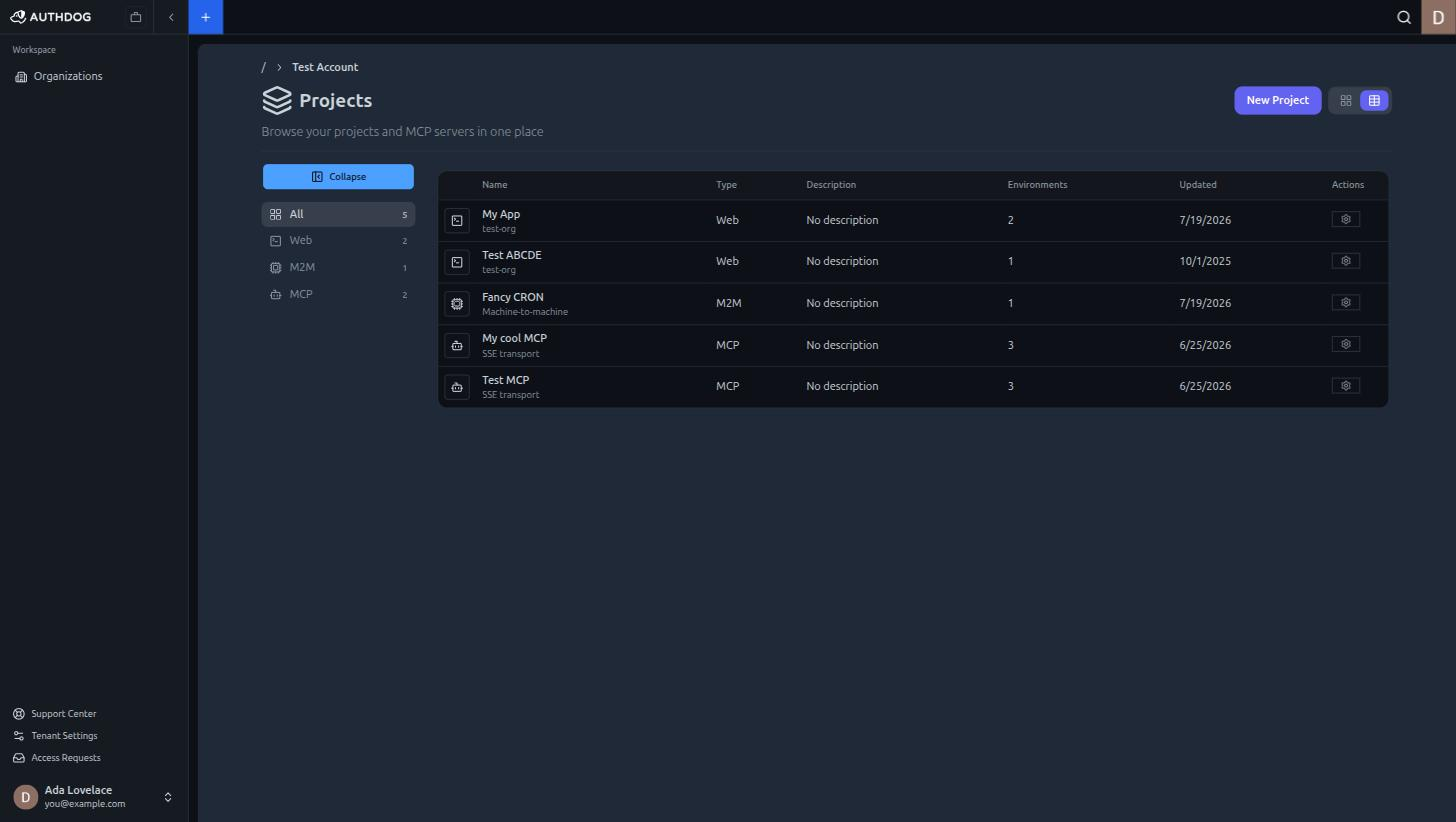
Project list
The page header reads "Projects" with the subtitle "Browse your projects and MCP servers in one place." A "New Project" button and a card/table view toggle sit in the top-right.
A rail on the left filters by project type, each entry carrying a count badge:
| Filter | Shows |
|---|---|
| All | Every project in the tenant. |
| Web | Web applications (consumer or B2B sign-in). |
| M2M | Machine-to-machine clients using the client credentials grant. |
| MCP | Model Context Protocol servers. |
Two layouts are available:
- Cards view: one card per project with name, description, organization, environment count, and last-updated date.
- Table view: columns for Name, Type, Description, Environments, Updated, and a per-row gear that opens project settings.
Under each project name the list shows a subtitle identifying it further: the organization for web projects, Machine-to-machine for M2M, and the transport (e.g. SSE transport) for MCP servers.
Create a project
Click "New Project" (or the "+" button in the top navigation bar) to open the Create application dialog. Its subtitle explains the model: "Applications let users and services from other systems securely access your product using their existing credentials."
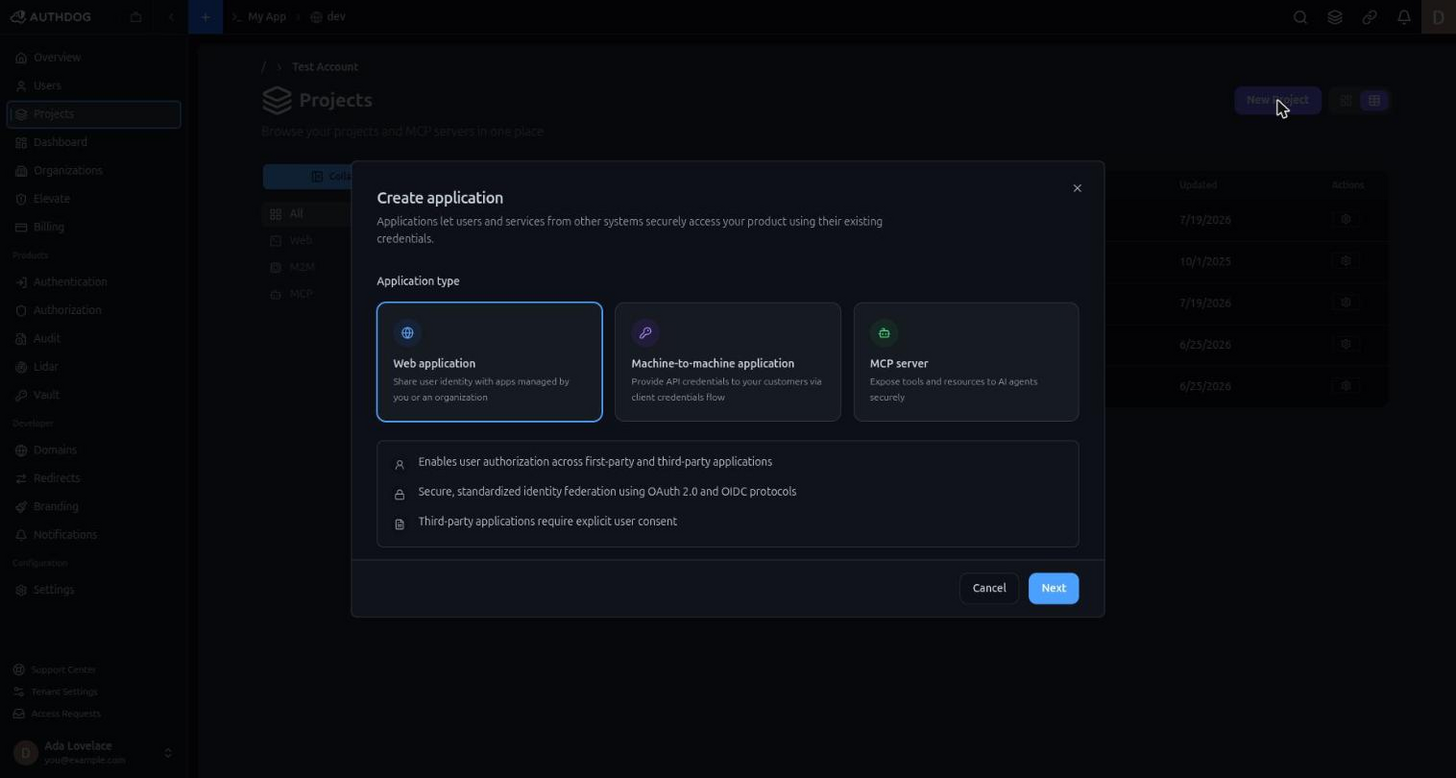
Pick an Application type. Selecting a card reveals what that type gives you, then click "Next" to fill in the details.
Web application
"Share user identity with apps managed by you or an organization."
- Enables user authorization across first-party and third-party applications
- Secure, standardized identity federation using OAuth 2.0 and OIDC protocols
- Third-party applications require explicit user consent
This is the type to pick for a normal sign-in experience: a SaaS app, a customer portal, a mobile app.
Machine-to-machine application
"Provide API credentials to your customers via client credentials flow."
- Issues a client ID and secret for server-to-server authentication
- Uses the OAuth 2.0 client credentials grant, no user interaction required
- Ideal for backend services, CLIs, and automated jobs
Creating an M2M project also creates an OIDC client configured for the client_credentials grant, so the project is usable as soon as the dialog closes.
MCP server
"Expose tools and resources to AI agents securely."
- Register a Model Context Protocol server for AI agents
- Secure, authenticated tool and resource access
- Manage scopes and access control after creation
MCP projects get an extra MCP Auth module in the sidebar, see MCP servers.
Form fields
| Field | Required | Details |
|---|---|---|
| Name | Yes | Minimum 2 characters. Shown in the project list, top bar, and breadcrumbs. |
| Description | No | Free-text summary of the project's purpose. |
| URL | No | Must be a valid URL if provided. For MCP servers this is the transport endpoint. |
Programmatically
Use the saveApplication mutation to create a web or M2M project:
mutation SaveApplication($meta: SaveApplicationInput!) {
  saveApplication(meta: $meta) {
    project { id }
    environments { id name }
    meta { ok { message } error { message } }
  }
}{
"meta": {
"tenantId": "<tenant-id>",
"name": "My Web App",
"description": "Customer-facing authentication portal",
"url": "https://app.example.com"
}
}MCP servers use saveMCPServer:
mutation SaveMCPServer($meta: SaveMCPServerInput!) {
  saveMCPServer(meta: $meta) {
    server { id name transportType }
    meta { ok { message } error { message } }
  }
}{
"meta": {
"tenantId": "<tenant-id>",
"name": "Auth Tools Server",
"description": "MCP server exposing authentication tools",
"serverUrl": "https://mcp.example.com/sse"
}
}What happens after selecting a project
Clicking a project selects it along with its pinned (or first) environment and navigates you to the Dashboard. The sidebar expands from the workspace-only view into the full module list: Overview, Users, Products, Developer, and Configuration.
The project type changes which modules appear, MCP projects gain MCP Auth, and the Authorization sub-items follow the environment's permission model.
Project settings
Rename a project, copy its ID, or delete it from Settings > General: see Project settings. The gear icon on a table row jumps straight there.
Related
| Read | To learn how to |
|---|---|
| Console overview | Understand the console layout and context switching |
| Tenants | Create and manage the workspaces that contain projects |
| Environments | Create and switch deployment environments for a project |
| Project settings | Rename, inspect, or delete a project |
| MCP servers | Register MCP servers and test agent auth |
| Machine identity | Use the client credentials grant from a backend |